The People File
You can view all of the people in Membership in one location, regardless of which Category they are assigned. The two separate Members and Visitors databases have now been merged for ease of navigation, into a single People database. This allows you to assign a Category to each Family, such as the standard Members or Visitors, and you can Add New Categories to meet your Church's specific needs. You can also choose to view only the people in a particular Category or a set of Categories. You may add as many or as few (minimum of 1) Categories as you need.
For example, you might need an additional Category for "Potential" members, one for "Out of Town" members, etc.
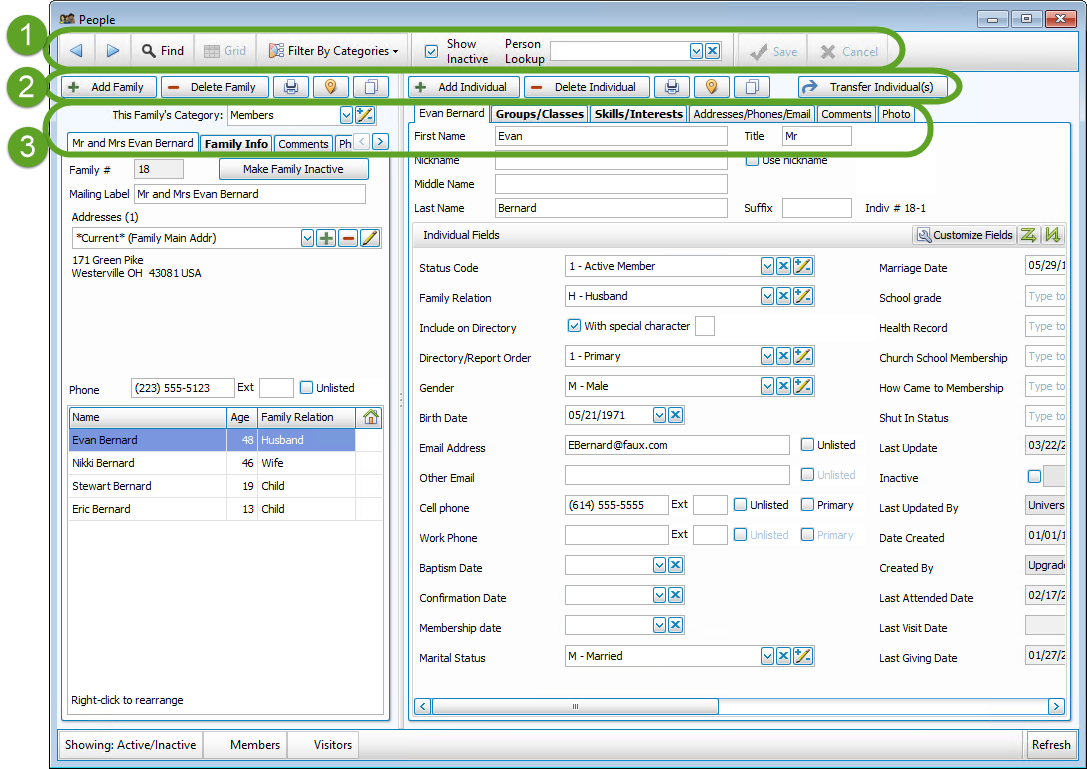
The toolbars across the top of the People screen contain different navigational and functional buttons. Below those buttons are the various Tabs used to organize and view your information on
The Family Record (left) and
The Individual Record (right) more quickly and coherently.
Two keyboard shortcuts that will aid your navigation and data entry in The People File are:
- CTRL + I moves your cursor to the Person Lookup box so you can start typing a name and quickly find a specific Individual
- CTRL + F will bring up the Find window, Using the Find Function will allow you to bring up a list of people who fit the search criteria you enter.
-
 Navigation Buttons
This first set of buttons help you navigate through the people in your database. These are Prior and Next, Find, Grid, Categories, and Person Lookup. When working in the program, only the buttons available for use at any particular time will be visible or highlighted.

 Prior
PriorClicking the Prior button will page backward through the records one by one toward the first record in your database. The default order of families will be alphabetical by last name of the 1 — Primary person. The records can also be sorted in the order in which they were entered into your system by going into Membership Settings.
To reach the very first record in your database, click Prior with the RIGHT mouse button. Next
NextClicking the Next button will page forward through the records one by one toward the last record in your database. The default order of families will be alphabetical by last name of the 1 — Primary person. The records can also be sorted in the order in which they were entered into your system by going into Membership Settings.
To reach the very last record in your database, click Next with the RIGHT mouse button.
 Find
FindClicking the Find button will allow you to look for and "find" one certain record or a group of records based on the information in any field in the Family or Individual records.
To find a certain record or group of records:
- Click Find.
- You will now enter search criteria just like you do for Membership reports. (You can even add Giving / Pledging and Accounts criteria to your Find.)
- Once you have entered all of your criteria, click Find.
Using the Find Function gives you the ability to create lists based on the information in any number of fields.
Note:
If only one record meets the criteria of your Find, then that specific record will appear on the screen. If more than one record meets your criteria, then these records will appear in The Find Grid. Find Grid
This button will only be visible AFTER you have performed a Find. Clicking this button will open The Find Grid that displays the results of your most recent Find. This grid is an amazingly flexible information manager; from this grid, you can view, sort, and edit information, print reports or labels, and export data, to name a few functions.

The Filter By Categories button allows you to choose view the people in either all Family Categories, a single Category, or only some of your Categories. Church Windows comes with Members and Visitors Categories by default, you can also Add New Categories. Check or uncheck the desired categories and click the "Show those selected" button.
This
 checkbox allows you to either show or hide records that have been marked Inactive (see Inactivate Records). If the box is checked Inactive records will be listed in red; if the box is unchecked Inactive records will be hidden.
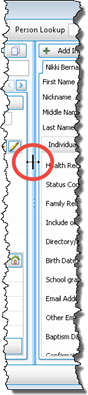
Instead of Using the Find Function to locate one specific individual, all you have to do is type their name into Person Lookup and then click on the name of the desired individual when you see it pop up.
Save
The changes you make to records will save automatically when you navigate away from the records, so you do not need to click the save button, however you can click it if it makes you feel more comfortable. This button will be grayed out unless changes have been made to the current record.
Cancel
Click to discard any changes you have made to a record. This button will be grayed out unless changes have been made to the current record.
-
Family and Individual Buttons
These buttons perform the same functions for both the Individual Record Fields and the Family Record Fields, though each has its own separate set of buttons.

 or
or 
There are now separate + Add buttons for either The Family Record or The Individual Record.
Add a Family
- Click the + Add Family button.
- Choose a The Family RecordIn The People File of Church Windows Membership, the Family record contains all of the information that pertains to all members of that family. It is possible to change or update this information at any time as needed, by simply making the necessary change in any Family Record Fields. Changes are saved automatically as they are made, however there a Save button you can click if it makes you feel more secure. To access the The Family Record screen: From The Initial Portal of Church Windows choose MembershipFrom the Quick Access Buttons in the center of the screen, choose PeopleThe Family Record Fields are on the left side of the People screen: There are several buttons across the top of the window, these buttons are as follows: Add a FamilyAdd a FamilyEven if you are only adding a single person, you must first add a Family record for them.Click the + Add Family button.First, a window will pop up where you must choose one of the Family Categories from the pop-up window (e.g. Members or Visitors or a custom category) and click the OK:If needed, click the Add/Edit Family Categories button in the bottom left to Add New Categories or edit existing category names, codes, or colors. Note:Once you select a category, you will have the option of saving that Category as the default Category for new Families by checking the box that appears. This setting is specific to each of your Users and can be changed at any time in Membership Settings.Then you will fill out the Family Record Fields, staring with the Mailing Label field. Enter the family name as you would like it to appear on Labels. Examples:Mr. and Mrs. William SmithMs. Joan Thomas Casey and Dana MillerThe Jones FamilyContinue to enter the rest of the Family Record Fields information on each of the Family information tabs.You must click the Add button to enter the Addresses.When you have finished entering Family information, then you are ready to click the Add an Individual button and fill out the Individual Record Fields.Delete a FamilyCaution!Deleting a family permanently removes that family’s records from your database. Once you delete a family, there is no way to recover the information it contained. If the individuals in the family have left your organization, you may want to complete the Make Family Inactive procedure instead.Delete a family and all individuals within the familyMake sure that the correct family record appears on the screen.Click — Delete Family.Church Windows will show a confirmation screen: If you are sure you'd like to delete this family, click to mark the Check here to confirm the deletion, then click OK box, then click OK.Note:Church Windows will not allow a record to be deleted if there has ever been any giving credited to that individual (or family) in the Donations Module, therefore if a donor terminates their membership, you must either Inactivate Records or Make Family Inactive if you wish to remove them from the active data. Again, keep in mind that it is not necessary to "delete" a person to keep them from appearing on reports or labels. If a person who passes away or leaves the Church is deleted as soon as they leave, then you will not be able to use Church Windows to create your end-of-the-year reports that need to know how many people left the Church during the year. A better way to remove these people from your system is to Inactivate Records by giving them a checkmark in the Inactive field and a code in the Inactive Reason field. Print, Map, or Copy Family Info PrintIf you would like to print information for this family only, for example you'd like just one quick label, then click the small printer button that appears to the right of the add and delete family buttons: Clicking this Print button will give you three choices: Report, Labels, or Email. Each will take you to the respective settings options. Once you have made all of your desired selections, either: Click Print to view a Print Preview and then proceed in sending the report or labels to your printer Click Export to save the fileClick Send Email Map AddressThis will take you to the internet to Create Maps from Addresses for the Family or Individual using any of the addresses in their record. Copy AddressThe Copy Address button allows you to copy any of the addresses for the Family or Individual to paste into another location, document, or application on your computer. CategoryThe dropdown field called This Family's Category: will display the Category currently assigned to the family (e.g. Members, Visitors, or any additional Family Categories you may have added). Clicking the dropdown button will allow you to change their assigned Category and clicking the Edit button allows you to edit, delete, or Add New Categories to the list of available Categories for all of your families: To add a highlight of color to help you quickly differentiate between Categories while browsing The People File, click your mouse in the rectangle in the Color column and choose a color (pastels are recommended for best visuals), for example: for the new family.
- Fill out the Family Record Fields for the new family.
- Move to the individual side to Add an Individual to the family.
- When you are finished with both sides, your changes are now automatically saved for you. There is no longer need to click the Save button, however you can if it makes you feel more secure.
Note:
We recommend that when adding families, you always add at least one person into the family. Do not leave The Individual Record on the right side of the screen blank. Even single people must have family records, Individual records cannot exist outside of Family records in Church Windows.Add an Individual
- Make sure that The Family Record that appears on the screen is the Family that the new person belongs to. If the appropriate family/individual record is not open, bring it to the screen using Person Lookup, the Prior and Next buttons, or Using the Find Function. If the family is not yet in the database, first Add a Family, even if you are just adding a single person they must have a family record.
- Click the + Add Individual button.
- Enter that person's Individual information.
Note:
If you enter a First and Last name which are exactly the same as an existing person in your database you will receive a warning including the Family Number and Mailing Label of the existing person. It will ask you to confirm if this duplication is intentional. For example: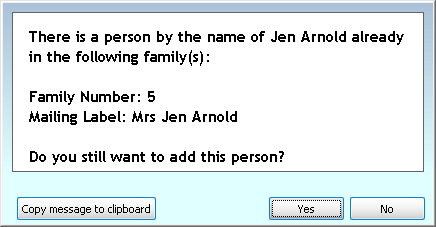
- The information you enter will save automatically when you navigate elsewhere, however, you can also click the Save button.
- Click Cancel to discard your input.
- To add another individual to this Family, select + Add Individual again, or select + Add Family to Add a Family.
Note:
It is possible to Transfer Individual(s) or Link another child to this family. There is never a need to create a new record and delete the old one nor create multiple records for the same person. or
or 
There are now separate — Delete buttons for either The Family Record or The Individual Record. The record that you wish to delete must appear on the screen when you click the button. If the appropriate family/individual record is not open, bring it to the screen using Person Lookup, the Prior and Next buttons, or Using the Find Function.
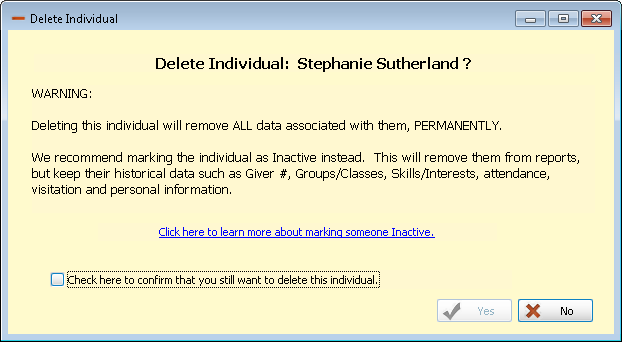
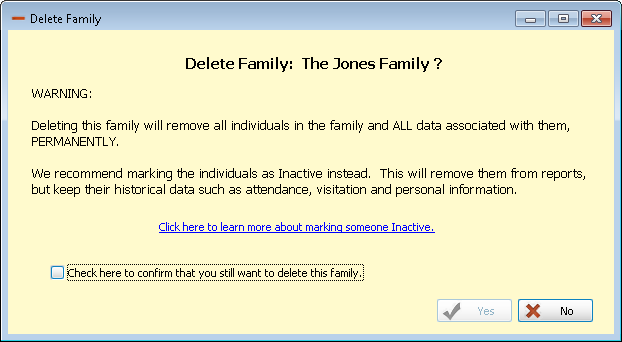
Caution!
Deleting a family or individual removes everything about this person from your system; it will be as if this person never existed. Before you delete people from your database, please consider this decision carefully. You would be deleting the Church’s historical records. In most situations, it is more appropriate to Inactivate Records or Make Family Inactive by giving them a code in their Inactive Reason (formerly Reason for Termination) field. An entry in this field essentially hides people within your active database, yet the information is still there for historical purposes.
For example, if you routinely delete members who transfer out or pass away, then you would not be able to get a report that includes the people who left your Church in a certain year and their reasons for leaving.
When you click the — Delete button to either Delete a Family or Delete an Individual, a confirmation screen will appear; click your choice to cancel or continue with the deletion:
OR
Note:
Church Windows will not allow a record to be deleted if there has ever been any giving credited to that individual (or family) in the Donations Module, therefore if a donor terminates their membership, you must either Inactivate Records or Make Family Inactive if you wish to remove them from the active data.
-
 Print
Print -
 Map Address
 -
 Copy Address
 -

This button will allow you to either Print, Map, or Copy Family Info or Print, Map, or Copy Individual Info information for the record you are currently viewing.
This will take you to the internet to Create Maps from Addresses for the Family or Individual using any of the addresses in their record.
The Copy Address button allows you to copy any of the addresses for the Family or Individual to paste into another location, document, or application on your computer.
The Transfer Individual(s) button allows you to move an individual record from one family record to another.
-
Information Tabs
Information tabs display more information about either The Family Record or The Individual Record. Click any of these tabs to view that specific information. To return the screen to the original view, click the first tab (the name of the Family or Individual):

Note:
If there is not enough room on the screen to display all of the tabs, small arrow buttons will appear at the right side of the tabs to allow you to view the rest of the tabs: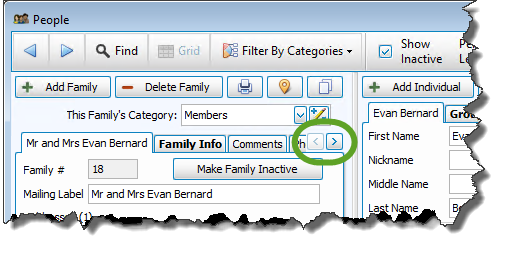 Family Tabs
Below are brief descriptions of the contents of each tab. Click the tab name for further details about the fields on that tab.
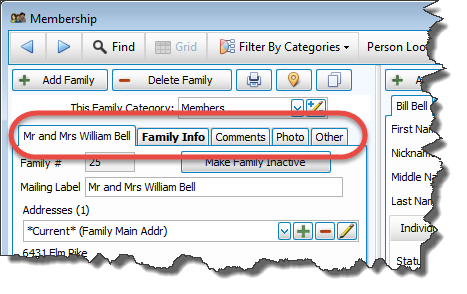
Main tab
Contains the Family Record Fields including the The Family RecordIn The People File of Church Windows Membership, the Family record contains all of the information that pertains to all members of that family. It is possible to change or update this information at any time as needed, by simply making the necessary change in any Family Record Fields. Changes are saved automatically as they are made, however there a Save button you can click if it makes you feel more secure. To access the The Family Record screen: From The Initial Portal of Church Windows choose MembershipFrom the Quick Access Buttons in the center of the screen, choose PeopleThe Family Record Fields are on the left side of the People screen: There are several buttons across the top of the window, these buttons are as follows: Add a FamilyAdd a FamilyEven if you are only adding a single person, you must first add a Family record for them.Click the + Add Family button.First, a window will pop up where you must choose one of the Family Categories from the pop-up window (e.g. Members or Visitors or a custom category) and click the OK:If needed, click the Add/Edit Family Categories button in the bottom left to Add New Categories or edit existing category names, codes, or colors. Note:Once you select a category, you will have the option of saving that Category as the default Category for new Families by checking the box that appears. This setting is specific to each of your Users and can be changed at any time in Membership Settings.Then you will fill out the Family Record Fields, staring with the Mailing Label field. Enter the family name as you would like it to appear on Labels. Examples:Mr. and Mrs. William SmithMs. Joan Thomas Casey and Dana MillerThe Jones FamilyContinue to enter the rest of the Family Record Fields information on each of the Family information tabs.You must click the Add button to enter the Addresses.When you have finished entering Family information, then you are ready to click the Add an Individual button and fill out the Individual Record Fields.Delete a FamilyCaution!Deleting a family permanently removes that family’s records from your database. Once you delete a family, there is no way to recover the information it contained. If the individuals in the family have left your organization, you may want to complete the Make Family Inactive procedure instead.Delete a family and all individuals within the familyMake sure that the correct family record appears on the screen.Click — Delete Family.Church Windows will show a confirmation screen: If you are sure you'd like to delete this family, click to mark the Check here to confirm the deletion, then click OK box, then click OK.Note:Church Windows will not allow a record to be deleted if there has ever been any giving credited to that individual (or family) in the Donations Module, therefore if a donor terminates their membership, you must either Inactivate Records or Make Family Inactive if you wish to remove them from the active data. Again, keep in mind that it is not necessary to "delete" a person to keep them from appearing on reports or labels. If a person who passes away or leaves the Church is deleted as soon as they leave, then you will not be able to use Church Windows to create your end-of-the-year reports that need to know how many people left the Church during the year. A better way to remove these people from your system is to Inactivate Records by giving them a checkmark in the Inactive field and a code in the Inactive Reason field. Print, Map, or Copy Family Info PrintIf you would like to print information for this family only, for example you'd like just one quick label, then click the small printer button that appears to the right of the add and delete family buttons: Clicking this Print button will give you three choices: Report, Labels, or Email. Each will take you to the respective settings options. Once you have made all of your desired selections, either: Click Print to view a Print Preview and then proceed in sending the report or labels to your printer Click Export to save the fileClick Send Email Map AddressThis will take you to the internet to Create Maps from Addresses for the Family or Individual using any of the addresses in their record. Copy AddressThe Copy Address button allows you to copy any of the addresses for the Family or Individual to paste into another location, document, or application on your computer. CategoryThe dropdown field called This Family's Category: will display the Category currently assigned to the family (e.g. Members, Visitors, or any additional Family Categories you may have added). Clicking the dropdown button will allow you to change their assigned Category and clicking the Edit button allows you to edit, delete, or Add New Categories to the list of available Categories for all of your families: To add a highlight of color to help you quickly differentiate between Categories while browsing The People File, click your mouse in the rectangle in the Color column and choose a color (pastels are recommended for best visuals), for example: , Family #, Mailing Label, Main Address and Phone, and lists the individual members of the family. If someone in the list of family members is in an additional family (see the Other tab below for more information), they will have a symbol in the final column of either an
 if you are view their "Additional" family or a
  if you are viewing their "Primary" family. If someone in the family is inactive, their name will be listed in red.
Family Info tab
Contains the Mailing Code, Geographic Area, and Family Email address, as well as information regarding the dates and times of the most recent updates to the family record.
Comments tab
This is where you may enter, edit, delete, or view any comments for the entire family.
Photo tab
This is where you can add Pictures for each family to be used in creating a pictorial Directory / Custom Reports. If you have assigned the family photo to the 1 — Primary person, as in previous versions of Church Windows, use the Indiv / Family Pictures tab in Settings to move that photo to The Family Record.
Other tab
This tab allows you to Link another child to this family. The person will not be removed from their original family, they will now appear with both families.
For example, a child whose parents are divorced but share custody can now appear in both family records without having to create two separate, duplicate individual records for the child.
Individual TabsBelow are brief descriptions of the contents of each tab. Click the tab name for further details about the fields on that tab:
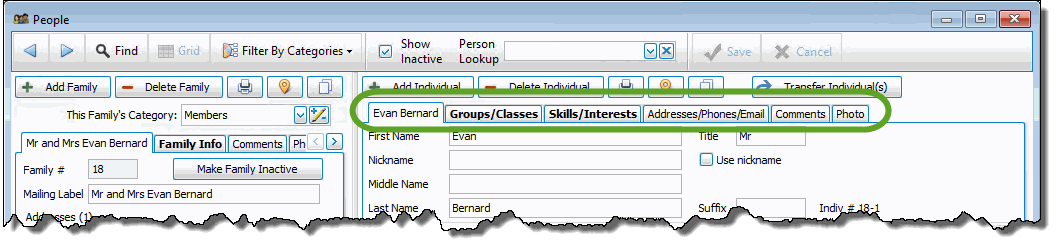
Name Tab
Contains the Individual Record Fields includes name and personal information for the individual (i.e. Directory/Report Order, birth date, email, cell phone, etc.).
Groups / Classes
When you click this tab, the Groups / Classes area of Church Windows will appear. Here, you will be Managing Groups / Classes from Individual Record. You may also view, delete, or edit the Groups or Classes in which an individual participates.
Skills / Interests
When you click this button, the Skills / Interests area of Church Windows will appear. Here, you will be Managing Skills / Interests from Individual Record. You may also view, delete, or edit the skills and interests in which an individual participates.
Addresses / Contacts
Here, you may view, add, or delete up to three alternate address for an individual. (They can be date-sensitive or not. The date range can be in MM/DD thru MM/DD format or it can include years as well.)
Comments
When you click the Comments tab, you may view, add, or delete comments or notes for an individual.
Photo
By clicking this tab, you can bring up Pictures for the individuals. Supported file types are the following formats: BMP, JPG, JPEG, GIF, PNG, or WMF. If you will have one photo for each family, we recommend that you save that photo to The Family Record — you are also able to add a photo for each individual. To move a photo from an individual to the family, use the Indiv / Family Pictures tab in Settings.
|
Dividing The Family Record and The Individual Record is a vertical gray bar with three dots in the center, this bar allows you to adjust the sizes of the family and individual sides of the screen.
|
  |

